
Guide • Driving in Japan
Japan foreign driving license conversion practical test: course map, commands you will hear, and common fails
After the document check and knowledge test, the next hurdle in the Tokyo foreign license conversion process is the driving skills verification. At Fuchu, knowing how to drive isn't enough. It's doing the expected checks, at the expected times, while following spoken instructions in Japanese.
This is Part 2 of 3 in a Fuchu foreign license conversion series: Part 1: Theory test, Part 2: Practical test, Part 3: I passed; now what?.
Last updated: 2026-01-28. If things have changed, contact us at hello@tabitalk.com.
Set expectations: skills got stricter after Oct 2025
Since Oct 2025, 2 additional "obstacles" were added to the test: train track crossing, and hill stop-and-go.
Treat this as a precision test, not a casual drive. More importantly, they are testing if you are safe on the road, not just if you can drive. This means making mirror and head checks obvious, stopping fully at stop lines, and not rolling into junctions.
Practice options (official course opening)
You can practice on the course itself. This will require you to acquire the services of a driving instructor, and you have to make a reservation call to the test center.
I do highly recommend it, as there are nuances to the Japanese driving test that I did not find in my home country that they may be particular with.
I personally went for 1 session (1h) on the course itself. If you are not confident after reading this guide, consider booking 2-3 sessions to fully drill the commands and course layout.
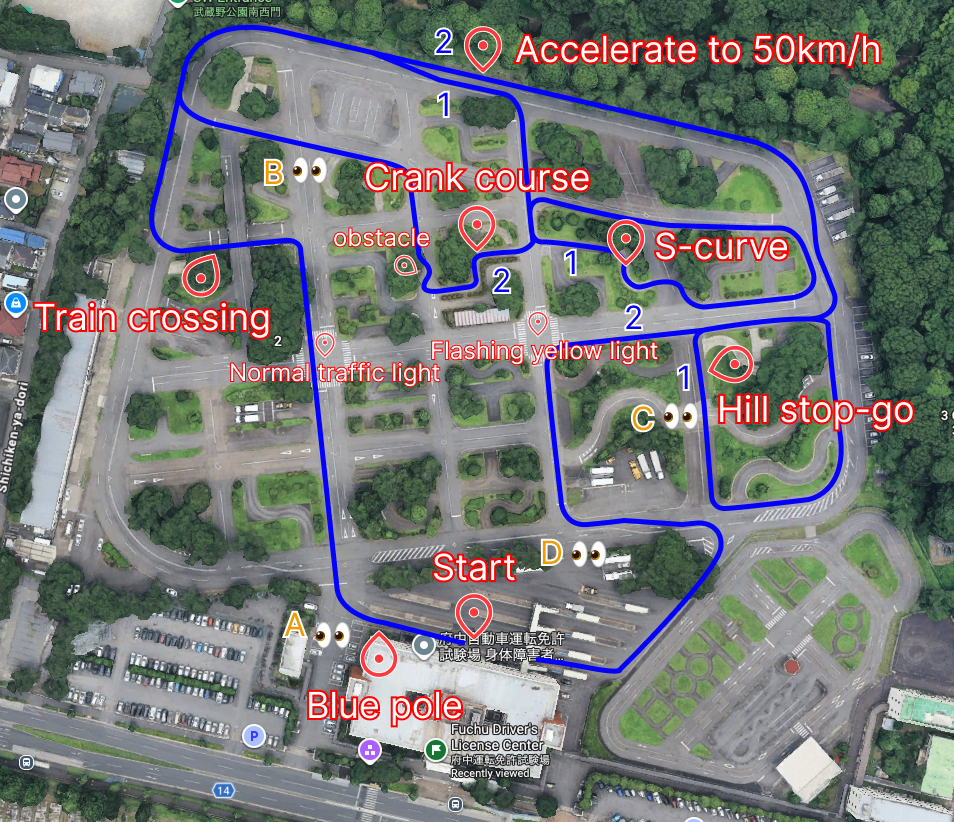
Course overview (with overlay)
Here is the route overlay referenced in the source notes. Use it to visualize the major segments and decide where you need to slow down and where you must make checks obvious.
Fuchu Driver’s License Center (Google Maps): Open map
Legends:
- Pins mark location of obstacles.
- 👀 Eyes mark common points of failure.
- 1&2 at route splits mark which route I travelled first.
To note, use this course map just for reference. This is the route I personally took, but it may not be the same route you will take on your practical test date. However, the obstacles and points to look out for will be the same.
On the day, there will be a queue of test takers. You will get a chance to observe the course route and commands (if you're not first in line), as you will be the passenger for the person in front of you. Similar, the next person will be your passenger and will sit at the back seat to observe.
Key obstacles / segments to cover
These are the segments to treat as “must-not-mess-up” zones. I’ve split them into headers so you can drill each one.
A 👀 / Start area and initial merge
From the starting point, you’ll be asked to drive about 10m and stop at a blue pole. This is where you familiarize yourself with the car (accelerator, brake, clutch). Once there, you’ll be given your first direction at the first junction (in my run, I went straight).
The first point of failure can happen even before your first stop line: right before it, there’s a junction coming out from a parking lot. Don’t get lulled into complacency. As you move forward, check your left for cars (including around parked cars).
Train track crossing
Do a full stop before the stop line. Wind down your window and listen for the train crossing chime. Check both sides (yes, there will not be a train, but you’re being examined), then proceed.
After you cross the tracks, wind up the window while stopping at the next stop line before the junction.
S-curve
I don’t have much to add here — it’s mostly muscle memory and visualization. If you have experience navigating tight roads or alleys, it should feel straightforward.
Crank course
Same story as the S-curve: this is mostly slow-speed control and good visual references.
Accelerate to 50 km/h zone
Accelerate to 50 km/h quickly, but don’t overshoot. Know exactly where 50 km/h sits on your speedometer. If you exceed it, you can fail immediately. Once you reach 50, you can ease off the pedal and prepare to slow down towards the bend.
B 👀 / No-traffic-light 4-way junction
This is a 4-way junction without a traffic light. As you pull in, slow down and make your head movement obvious: look left and right.
C 👀 / Hill stop-and-go
You’ll be asked to pull up to a cone by the hill. I used the handbrake to ensure the car won’t roll back. To move off, lightly step on the accelerator while releasing the handbrake.
Before moving off: signal right, then do the full check (rear-view mirror, side mirror, blind spot). Then move off smoothly.
At the top of the hill there is a junction — slow down and check for cross traffic on both the left and right before proceeding.
Flashing yellow light
Treat this like entering a junction: slow down, confirm there is no cross traffic, then proceed.
D 👀 / Blind corners + convex mirrors (end-of-course trap)
I saw someone fail right at the end because the instructor applied the brake. Some junctions have blind corners (for example, hedges blocking your view). Use the convex mirror ahead to confirm whether cross traffic is coming.
If you see even a sliver of a car, do not proceed from the stop line. You won’t have time to move out safely and you can fail. Wait until it’s clear, pull up slowly while checking around the blind corner, and only proceed once you have full view and it’s safe.
Non-obstacle habits that examiners care about
- Moving off from a stop: check rear-view mirror, side mirrors, both blind spots, signal right, then move off.
- Before turns: do the 3-point check (rear-view mirror, side mirror, blind spot).
- Early lane positioning for turns: when told to turn left/right (hidari / migi), immediately do the 3-point check, as you’re expected to position your car to the left/right side of your lane before the junction (to avoid cyclists/motorcycles on the side you’re turning into), while still going straight to the stop line. Then check again at the junction before turning.
- Right turns into multi-lane roads: on roads with 2+ lanes, you will be expected to turn into the leftmost lane (not the nearest/right lane), because you’re expected to keep left. This is different from my own experience in my home country where you’re expected to turn into the nearest lane before signalling to move to the leftmost lane. Here, you turn straight into the leftmost lane.
Spoken commands: cheat sheet (starter set)
The fastest way to reduce mistakes is to recognize the commands instantly. Here is a list of phrases I recommend you drill.
- X番で右/左/まっすぐ (X-ban de migi / hidari / massugu): at marker number X, turn right/left/go straight.
- 突き当たり右/左 (tsukiatari migi / hidari): at the dead end (T-junction), turn right/left.
- 50キロスピードまで出してください (gojū kiro supiido made dashite kudasai): please accelerate up to 50 km/h.
- Xで止まってください (tomatte kudasai): please stop at X.
Practice on TabiTalk: build a listening drill pack
If you can hear a command and instantly map it to an action, you free up brain space for driving and safety checks. One practical way to train this is to turn the command list into short listening drills.
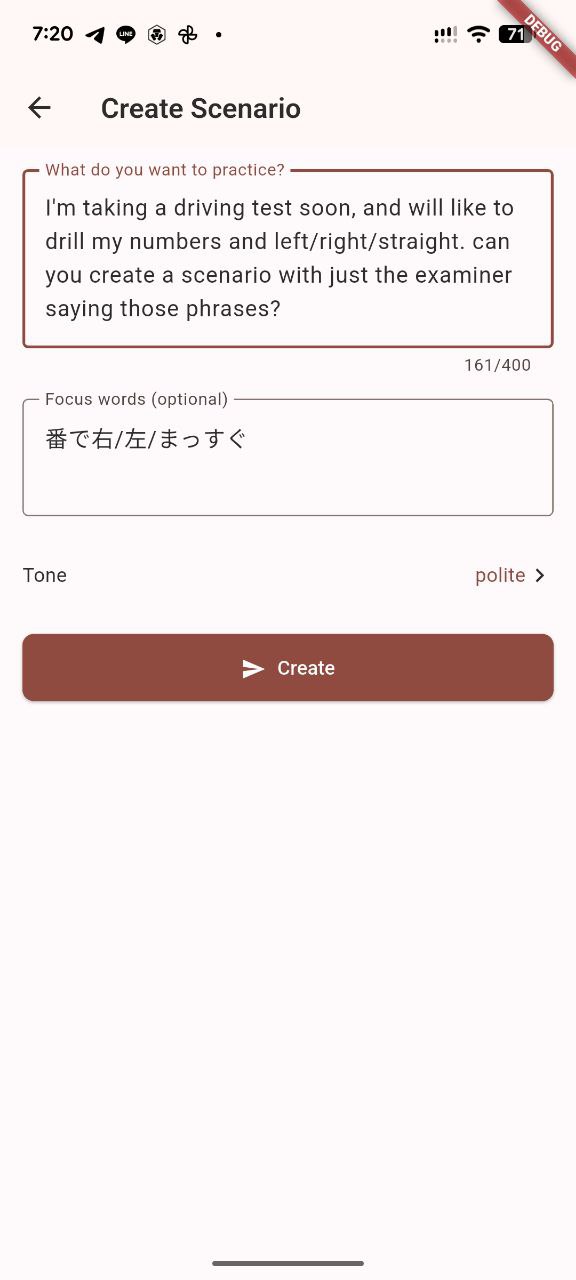
Create your own scenario with the exact phrases you need
The fastest way to make TabiTalk useful for this test is to create a custom scenario and paste in the commands/phrases you personally heard (or expect to hear). Then you can drill them until they feel automatic.
- Open TabiTalk and go to the scenario catalog.
- Tap Create scenario.
- Describe what you want to practice: "help me drill for my driving test, where the instructor will say x番で右/左/まっすぐ, where x is between 1 to 20".
- Tap Create
- While practicing, bookmark terms that you want to practice more of.
- Listening drills will be generated daily for you to practice so you can respond instantly when the day comes.
Sources
Practise the commands before test day
If this is exactly what you need, TabiTalk can help you practise recognition of short spoken commands and traffic terms, so you can spend test-day attention on safety checks and driving.